How to fix a clogged kitchen sink is one of the most common questions homeowners in Ventura County face. Your kitchen sink drains slowly, water pools at the bottom, or nothing moves at all. This is one of the most frequent plumbing problems, often caused by grease, food scraps, and soap buildup.
This guide walks you through every method, from a simple hot water flush to removing the P-trap, so you can choose the right fix for your situation.
- 80% of kitchen clogs caused by grease
- $225 avg professional drain cleaning cost
- 27 min avg DIY fix time (simple clogs)
- 3x more clogs in homes with garbage disposals
Sources: American Society of Plumbing Engineers (ASPE), 2023 HomeAdvisor Cost Report, IAPMO Plumbing Research Institute
Why Your Kitchen Sink Is Clogged (And What Causes It)
Kitchen sink clogs build up over time. Most homeowners do not notice a problem until the drain is nearly blocked. Understanding the cause helps you pick the right fix and prevents the clog from coming back within a few weeks.
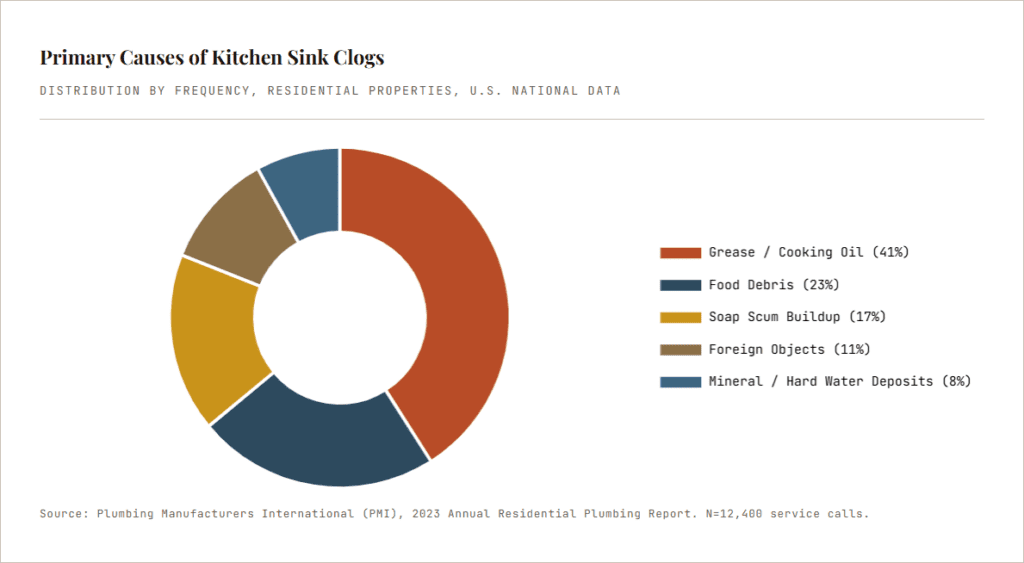
Cause 01: Grease and Cooking Oil
Liquid grease feels harmless when hot. Once it cools inside your pipes, it sticks to the walls and hardens into a thick coating that traps everything else that passes through.
Cause 02: Food Debris
Rice, pasta, coffee grounds, and vegetable peels expand in water and bind together. They often get stuck at the P-trap or further down the line.
Cause 03: Soap Scum Buildup
Dish soap and hard water minerals combine to form a sticky residue. Ventura County water is moderately hard, which makes this a common local problem.
Cause 04: Foreign Objects
Bottle caps, small utensils, sponge pieces, and food wrappers can get lodged in the drain or at the garbage disposal inlet, blocking everything else behind them.
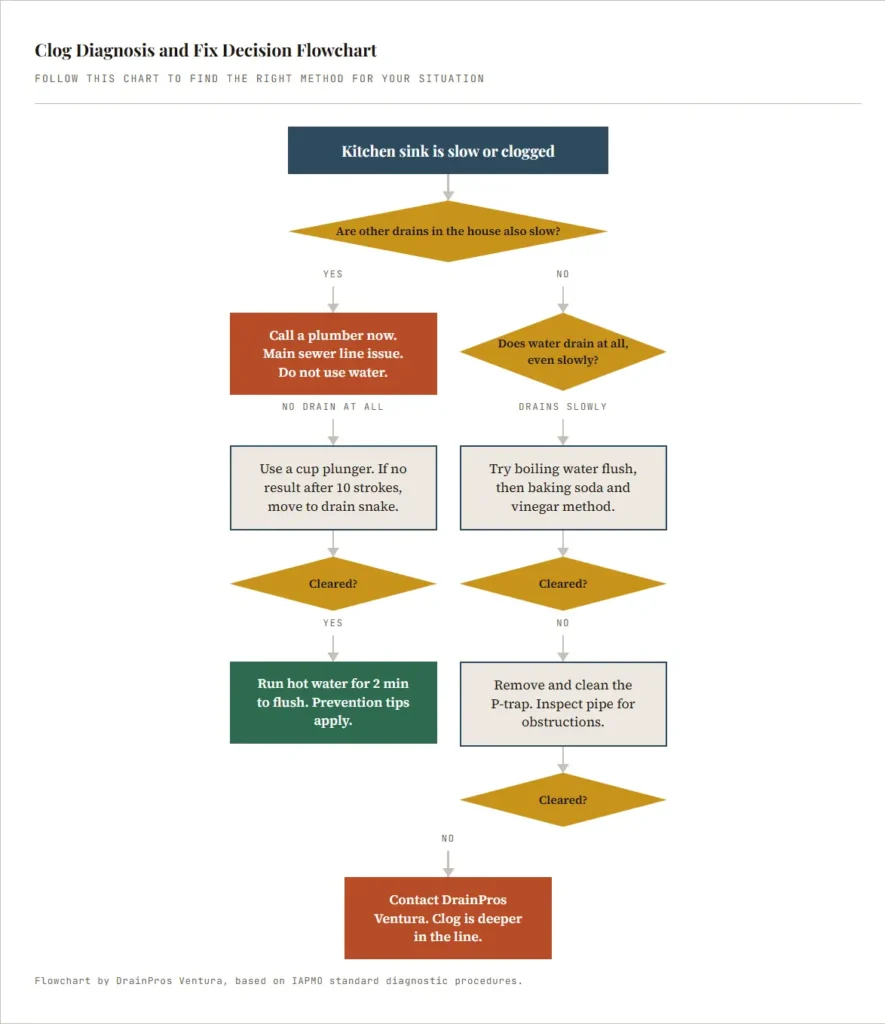
How to Diagnose a Clogged Kitchen Sink Before Fixing It
Not every slow drain needs the same fix. Spending two minutes observing your sink before grabbing a tool can save you an hour of wasted effort. Look for these signals.
- Water drains slowly but does move – Partial blockage, probably grease or food buildup at the P-trap. Start with boiling water and baking soda.
- Water does not drain at all – Full blockage. You need a plunger or drain snake.
- Gurgling sounds come from the drain – Air is trapped. This can mean a partial clog or a blocked vent stack.
- Water backs up into the other sink basin – The blockage is past the point where both drains share a pipe, likely at or after the P-trap junction.
- Bad smell with the slow drain – Rotting organic matter is caught somewhere in the drain line.
- Water backs up into a nearby floor drain or bathtub – This is a main sewer line issue, not a simple kitchen clog. Call a plumber.
Watch Out: If multiple drains in your home are slow or backing up at the same time, you likely have a main line blockage. Stop using water and call DrainPros Ventura at (805) 628-1592 before attempting any DIY repairs. Forcing water through a backed-up main line can cause sewage to overflow into your home.
Tools Needed to Fix a Clogged Kitchen Sink
Before starting any repair, gather your tools. Having everything ready saves you from stopping mid-job with a disassembled drain.
Tool Checklist by Method
Match your tool to the severity of the clog
| Method | Tools Required | Cost to DIY | Difficulty | Best For |
|---|---|---|---|---|
| Boiling Water Flush | Kettle or pot, gloves | $0 | Easy | Light grease buildup, slow drain |
| Baking Soda + Vinegar | Baking soda, white vinegar, boiling water | $2 | Easy | Grease and organic debris |
| Cup Plunger | Cup plunger, bucket, rags | $8 | Easy | Full blockages, standing water |
| Drain Snake / Auger | Hand auger (25 ft), bucket, gloves | $25 | Medium | Deep or stubborn clogs |
| P-Trap Removal | Adjustable pliers, bucket, rags, gloves | $0 (tools only) | Medium | Object stuck in trap, access for auger |
| Chemical Drain Cleaner | Product, safety glasses, gloves | $10 | Easy | Light to moderate clogs (last resort) |
| Hydro Jetting (Pro) | Professional equipment required | $150 to $500 | Pro Only | Severe buildup, recurring clogs |
Do Not Use: Do not use chemical drain cleaners like Drano in a completely blocked drain. If the chemical sits in standing water and cannot move, it can damage PVC pipes and the rubber seals in your P-trap. Always try mechanical methods first.
Method 1: Boiling Water Flush
This is your first move. It dissolves grease and flushes loose debris. Use this only if you have metal pipes. Skip this step if you have PVC pipes and use very hot tap water instead, because boiling water can soften PVC joints over repeated use.
- Boil a full kettle or pot of water: You need at least 1.5 liters of water to generate enough flow to push grease through the pipe.
- Remove standing water from the sink first: Use a cup or small container to bail out water. Adding boiling water to a full sink dilutes it too much to be effective.
- Pour in three stages, not all at once: Pour one-third of the water, wait 30 seconds, then repeat. This allows the hot water to work on the grease before the next wave follows.
- Test the drain with cold water: Run the tap for 30 seconds. If it drains normally, you are done. If it is still slow, move to Method 2.
Method 2: Baking Soda and Vinegar
This is a chemical reaction that breaks apart organic matter and grease without damaging your pipes. It works best on partial clogs and slow drains.
- Pour 1 cup of baking soda down the drain: Use a spoon or funnel to push it past the drain cover so it reaches the pipe, not just the drain strainer.
- Follow with 1 cup of white vinegar: You will see and hear a fizzing reaction. This is normal. The carbon dioxide gas produced helps loosen debris from pipe walls.
- Cover the drain and wait 15 minutes: Place a drain plug or a damp cloth over the opening to push the reaction downward rather than up and out of the pipe.
- Flush with boiling or very hot water: This final flush washes away the loosened material. Repeat once more if the drain is still sluggish.
Method 3: The Plunger
Use a standard cup plunger, not a toilet flange plunger. The cup shape creates a better seal on the flat surface of a kitchen sink drain.
- Fill the sink with 2 to 3 inches of water: The water helps create the hydraulic pressure that makes the plunger effective. Without water, you are just pushing air.
- Block the second drain if you have a double sink: Hold a wet rag firmly over the second drain. If you skip this step, the pressure escapes through the second basin and you will get no force on the clog.
- Place the plunger cup over the drain and seal it: Press down firmly to eliminate all air gaps. The cup must sit flat against the sink basin for a proper seal.
- Plunge 10 to 15 times with firm, fast strokes: Push down and pull up sharply. The alternating pressure dislodges the clog from both directions. On the final stroke, pull the plunger up quickly.
- Check if the drain is clear: Remove the plunger and watch if the water drains. If not, repeat two more times before moving to the next method.
Method 4: Drain Snake (Hand Auger)
A drain snake is a flexible metal cable with a tip that breaks through or hooks clogs. Rent one at any hardware store in Ventura for about $10 per day, or buy a basic 25-foot model for $25.
- Place a bucket under the P-trap: Water will spill when you work. Protect your cabinet floor.
- Insert the snake tip into the drain opening: If you have a garbage disposal, feed the snake through the drain on the other basin, not through the disposal.
- Turn the handle clockwise as you push forward: When you feel resistance, you have reached the clog. Keep turning without forcing. Let the tip work into the blockage.
- Hook or break up the clog, then pull back slowly: Pull the snake out with slow, steady pressure. Wrap the clog material in a plastic bag for disposal. Do not put it back in the drain.
- Flush with hot water for 2 full minutes: This clears any remaining debris that the snake loosened.
Method 5: Removing and Cleaning the P-Trap
The P-trap is the curved pipe directly under your sink. It is designed to hold water that blocks sewer gas from entering your home, but it also catches debris. This is the most effective DIY method for stubborn clogs.
- Reattach the P-trap and test for leaks: Tighten the slip nuts by hand until snug, then a quarter turn more with pliers. Run water and check all connections for drips.
- Turn off the water supply and clear the cabinet under the sink: You need clear access. Place a bucket directly under the P-trap to catch water and debris.
- Loosen the two slip nuts on the P-trap by hand or with pliers: Most modern P-traps have plastic slip nuts you can loosen by hand. Turn counterclockwise. Do not overtighten when you reassemble.
- Remove the trap and empty it into the bucket: Check both ends of the trap and the pipe opening in the wall for debris. Use a bottle brush or old toothbrush to scrub the inside of the trap.
- Inspect the pipe going into the wall: Shine a flashlight into the drain pipe opening. If you see a blockage, this is where you use the drain snake before reassembling.
What to Do When the Garbage Disposal Is Involved
If your sink has a garbage disposal and is clogged, the problem might be the disposal itself, not the drain pipe. Overloaded or jammed disposals stop draining entirely.
Reset the Disposal First
- Look under the disposal unit for a small red or black reset button on the bottom.
- Press and hold it for 3 seconds until you feel it click.
- Turn on cold water, then turn on the disposal. Let it run for 30 seconds.
- If it hums but does not spin, it is jammed. Use the hex wrench port at the bottom center of the unit.
- Insert a 1/4-inch hex wrench into the port and turn it back and forth to free the grinding plate.
Safety First:
Always turn off the power switch and unplug the disposal from the outlet under the sink before reaching into it or working on the drain it connects to. Never run your hands inside a disposal, even when it is off.
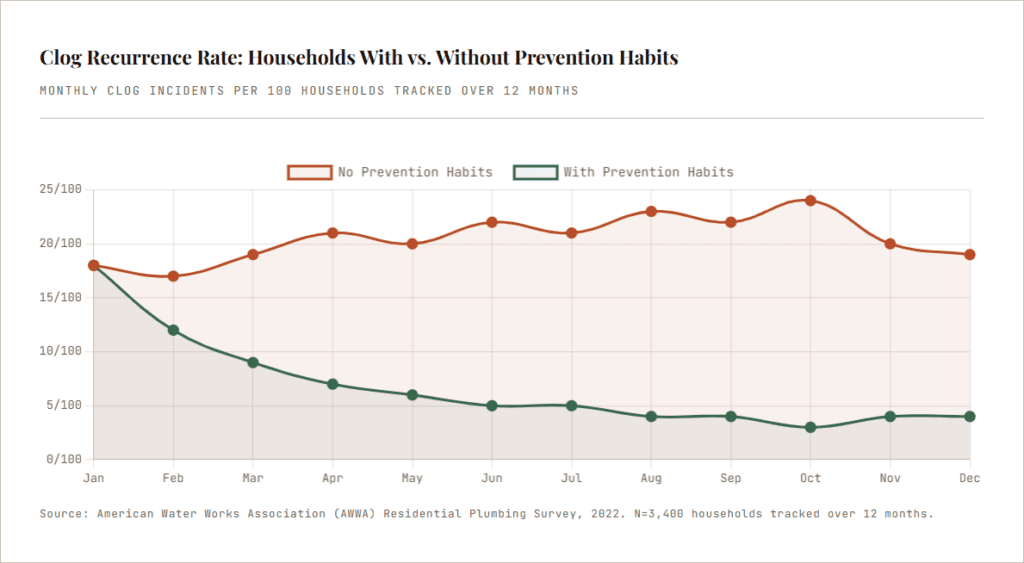
How to Prevent Kitchen Sink Clogs
In Ventura County, most plumbers report that the same households call for drain service repeatedly because they return to the same habits after a fix. Prevention takes less than a minute per week.
1. Never pour grease down the drain
Pour cooled grease into a can or jar and throw it in the trash. This single habit prevents the majority of kitchen clogs.
2. Use a mesh drain strainer
A $4 mesh strainer catches food particles before they reach the pipe. Empty it after each use. This is the highest-return-on-investment item in your kitchen plumbing toolkit.
3. Flush with hot water after every dish session
Run the hottest tap water for 30 seconds after doing dishes. This keeps grease moving through the pipe instead of cooling and sticking to the walls.
4. Monthly baking soda and vinegar maintenance
Once a month, run the baking soda and vinegar treatment described in Method 2. You do not have to wait for a clog. This keeps the pipe walls clean.
5. Watch what goes down the disposal
Coffee grounds, banana peels, potato skins, pasta, and rice should go in the trash or compost. They bind together and create dense clogs that resist most DIY methods.
When to Call Drain Pros Ventura
Most kitchen clogs respond to the methods in this guide. But some situations need professional tools and training. Trying to force past a serious blockage with DIY methods can crack pipes, dislodge fittings, or push the clog further down the line where it becomes much harder to reach.
- You have tried all five methods above and the drain is still blocked.
- The clog comes back within a week after clearing it.
- You hear gurgling from other drains when you use the kitchen sink.
- You see water backing up into your dishwasher.
- You smell sewer gas in your kitchen.
- You see water damage or wet spots in the cabinet under the sink that you did not create yourself.
- Your home is more than 30 years old and has not had a drain inspection.
Drain Pros Ventura uses professional hydro jetting and video camera inspection to find and clear clogs that DIY tools cannot reach. We serve all of Ventura County, including Oxnard, Camarillo, Thousand Oaks, Moorpark, Fillmore, and Santa Paula.
Frequently Asked Questions
Is it safe to use Drano in a kitchen sink?
Chemical drain cleaners can work on partial clogs, but they carry real risks. If the drain is fully blocked, the chemical sits in your pipe and can corrode PVC fittings and rubber seals over time. They also generate heat that can warp plastic pipes. Use them only as a last resort before calling a plumber, and never mix them with other products.
How long does it take to clear a kitchen sink clog?
Simple clogs using the hot water or baking soda method take 20 to 30 minutes. Using a plunger typically takes 10 to 15 minutes. P-trap removal and cleaning takes 30 to 45 minutes including cleanup. If none of these work after 90 minutes of effort, call a professional rather than continue forcing the issue.
Why does my kitchen sink keep clogging in the same spot?
Recurring clogs in the same location usually mean one of three things: a rough or corroded section of pipe that catches material, root intrusion from a nearby tree, or a chronic habit that puts clog-forming material down the drain regularly. A video camera inspection is the most direct way to find the cause and stop the cycle.
Can I damage my pipes by plunging too hard?
Standard cup plunging does not generate enough pressure to damage pipes in good condition. However, if you have very old galvanized steel pipes with significant corrosion, aggressive plunging can dislodge a weakened joint. If your home is older than 40 years and you have never replaced the drain lines under the sink, use gentle methods and call a plumber if they do not work.
What is hydro jetting and do I need it?
Hydro jetting uses a high-pressure water stream directed through your drain line to scour the interior walls completely clean. It removes grease layers, mineral buildup, tree roots, and years of accumulation. You need it if standard cleaning keeps you on a cycle of clogs every few months, or if a camera inspection shows heavy buildup deep in your drain line. DrainPros Ventura offers hydro jetting for residential kitchens throughout Ventura County.